VBA or Visual Basic for Applications is a light weight programming language (quite similar to Visual Basic) that allows automation of tasks in MS-Office Applications.
UDI Magic v3.0 or higher supports the use of VBA. Using VBA, you can sort data; perform calculations; insert or delete columns or rows in MS-Excel at run-time. In simple words, VBA allows you to do almost any task that you can manually do in MS-Office Applications.
In this exercise, we shall take up "How to use VBA (Visual Basic for Applications) with UDI Magic ?"
STEP 1: Creating a macro file
To begin with, we shall write a simple macro that displays a message "Hello World". You can use Notepad (or any text-editor) to create macro files. Here's a simple macro file (Exercise-15-macro.txt) which displays a message.
Sub HelloWorld
MsgBox "Hello World !!!"
End Sub
Remarks:-
1) Sub...End Sub is used to declare a procedure / routine.
2) Google for "Excel VBA" for more help on writing VBA macros.
Before we write XML tags for importing data from our Excel sheet into Tally, let's have a look at the UDI Magic supported XML tags for loading and executing macros.
XML tags for Loading / executing the Macro file
Syntax:-
<VBA LOADFILE="macro-filename-with-path" RUNMACROATSTARTUP="macro-name"/>
Example 1:-
<VBA LOADFILE="exercise-15-macro.txt" RUNMACROATSTARTUP="HelloWorld"/>
Example 2:-
<VBA LOADFILE="c:\exercise-15-macro.txt" RUNMACROATSTARTUP="HelloWorld"/>
Explanation:-
1) In the first example, we have not specified the full-path for the macro-file. Hence, UDIMagic searches for the macro-file in the UDI Magic startup folder. In the second exmple, we have specified the full-path for the macro-file.
2) The tag <VBA> is UDI Magic specific.
3) The attribute LOADFILE="macro-filename" is used to specify the macro-filename.
4) The attribute RUNMACROATSTARTUP is used to specify the macro name which is to be executed at startup.
5) The Macro-file is executed before the Excel sheet data is processed. As a result,the macro used in this exercise displays a message "Hello World".
STEP 2: Create an Excel Sheet and write XML tags for it
To make the task simple, we shall take up an Excel sheet with Stock Item Masters records (having only one field i.e. the NAME field).
Download the Excel sheet with the XML tags. For your reference, the XML tags given below:-
<XMLTAGS CELLREFERENCE="A1" xmlns:UDF="TallyUDF">
<!-- This loads and processes the macro-file -->
<VBA LOADFILE="exercise-15-macro.txt" RUNMACROATSTARTUP="HelloWorld"/>
<!-- Create StockItem Masters -->
<MASTER TYPE="STOCKITEM">
<NAME.LIST>
<!-- Fetch the value for NAME tag from Column A of Excel Sheet -->
<NAME COLUMNREFERENCE="A"/>
</NAME.LIST>
</MASTER>
</XMLTAGS>
Friday, June 20, 2008
Tuesday, June 17, 2008
Exercise 14: Import data into Multiple Companies simultaneously
Using UDIMagic v3.0 Release 1.48 or higher, you can import data into Multiple Companies simultaneously.
Here's an Excel sheet that contains Stock Item master records. The XML tags for this Excel sheet have been written such that the data is imported into two companies simultaneously.
Download the Excel sheet with the XML tags.
Follow these steps to import data into Tally
1) Create a company named "Company A" in Tally.
2) Create another company named "Company B" in Tally.
3) Next, Minimize Tally software.
Make sure that both the companies are open in Tally.
4) Run UDI Magic software and select option "Excel to Tally".
5) Next, select option "Masters".
6) Next, select the Excel sheet and the XML tags file.
You must select the XML tags file in the same screen in which you are prompted to select the Excel file.
7) Follow the wizard instructions to import data into Tally.
Understanding the XML tags
The XML tags used in this exercise are quite simple. We have already written such tags (for Stock Item Master) in our previous exercises. Now, let's see how do we import data into multiple companies...
STEP 1
Write XML tags to create STOCKGROUP masters
<!--This will create StockGroup Masters in Company A -->
<MASTER TYPE="STOCKGROUP" COMPANYNAME="Company A"/>
<NAME.LIST>
<!--Fetch StockGroup Name from Column B of the Excel Sheet-->
<NAME COLUMNREFERENCE="B"/>
<NAME.LIST>
</MASTER>
<!--This will create StockGroup Masters in Company B -->
<MASTER TYPE="STOCKGROUP" COMPANYNAME="Company B"/>
<NAME.LIST>
<!--Fetch StockGroup Name from Column B of the Excel Sheet-->
<NAME COLUMNREFERENCE="B"/>
<NAME.LIST>
</MASTER>
Remarks:-
1) Note that COMPANYNAME attribute is used to specify in which Company the data is to be imported.
2) We used the same tags twice, only the Company Name has been changed.
STEP 2
Write XML tags to create STOCKITEM masters
<!-- Create STOCKITEM Masters in Company A-->
< MASTER TYPE="STOCKITEM" COMPANYNAME="Company A">
<NAME.LIST>
<!-- Fetch the value for NAME tag from Column A of Excel Sheet -->
<NAME COLUMNREFERENCE="A"/>
</NAME.LIST>
<!-- StockGroup Name is to be taken from Column B-->
<PARENT COLUMNREFERENCE="B"/>
</MASTER>
<!-- Create STOCKITEM Masters in Company B-->
< MASTER TYPE="STOCKITEM" COMPANYNAME="Company B">
<NAME.LIST>
<!-- Fetch the value for NAME tag from Column A of Excel Sheet -->
<NAME COLUMNREFERENCE="A"/>
</NAME.LIST>
<!-- StockGroup Name is to be taken from Column B-->
<PARENT COLUMNREFERENCE="B"/>
</MASTER>
IMPORTANT:-
1) To import data into multiple Companies, you must use UDIMagic v3.0 Release 1.48 or higher. The Demo version can be downloaded from the Downloads web-page at our site http://www.rtslink.com/downloads.html
2) Those using licensed UDIMagic are requested to write to sales @ rtslink.com (remove spaces) for more information.
Monday, June 16, 2008
Exercise 13: Using the COMPANYNAME attribute
When you import data into Tally Software using UDIMagic, it gets imported into the Current Company, by default.
To import data into a specific Company in Tally, you need to use the COMPANYNAME attribute. Generally, this is required when two or more companies are open in Tally and you wish to import data into a specific company.
Herein, we shall take a simple Excel sheet that contains Stock Item Masters. For simplicity, we have taken only the Stock Item NAME in the Excel Sheet.
Download the Excel sheet with the XML tags.
Follow these steps to import data into Tally
1) Create two Companies in Tally. viz "Company A" and "Company B"
2) Select the "Company A".
3) Minimize Tally software.
4) Run UDIMagic and follow instructions in the wizard to Import data from the sample Excel-sheet.
You must select the XML tags file in the same screen in which you are prompted to select the Excel file.
If everything goes fine, then 5 Stock Item master records will be imported into "Company B" in Tally.You can view the same using "Gateway of Tally >> Inventory Info >> Stock Item >> Display" option.
Attribute : COMPANYNAME
Applies to: MASTER and VOUCHER tags
Example 1:-
<MASTER TYPE="LEDGER" COMPANYNAME="MyCompany">
.....XML tags.....
</MASTER>
Example 2:-
<VOUCHER COMPANYNAME="MyCompany">
.....XML tags.....
</VOUCHER>
Remarks:-
1) The COMPANYNAME attribute can be used with the MASTER and VOUCHER tags only.
2) If there two or more MASTER tags (or VOUCHER tags) in a single XML file, then you need to use the COMPANYNAME attribute with each MASTER tag.
Saturday, June 14, 2008
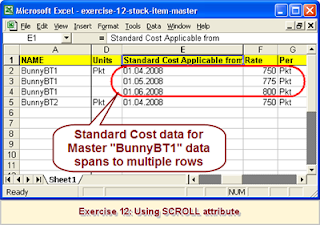
Exercise 12: Using the SCROLL attribute
In this exercise, we shall take up an Excel sheet that contains Stock Item Master records with Standard Cost and Standard Price details. As the data for a single MASTER record may span to multiple rows, we have used the SCROLL attribute which is described later on.
Here's a snapshot of the Excel sheet that we shall be using in this exercise. You can create a similar sheet or Download it from here.
STEP 1
Write XML tags to create UNIT masters
<MASTER TYPE="UNIT"/>
<NAME COLUMNREFERENCE="D"/>
<ISSIMPLEUNIT>Yes</ISSIMPLEUNIT>
</MASTER>
Remarks:-
a) The above XML tags instruct UDIMagic to create UNIT Masters based on Column D data in the Excel sheet.
STEP 2
Write XML tags to create STOCKGROUP masters
<MASTER TYPE="STOCKGROUP"/>
<NAME.LIST>
<NAME COLUMNREFERENCE="C"/>
<NAME.LIST>
</MASTER>
STEP 3
Write XML tags to create Stock Item Masters
<!-- Create STOCKITEM Masters -->
< MASTER TYPE="STOCKITEM">
<NAME.LIST>
<!-- Fetch the value for NAME tag from Column A of Excel Sheet -->
<NAME COLUMNREFERENCE="A"/>
<!-- ALIAS to be taken from Column B of Excel Sheet -->
<NAME COLUMNREFERENCE="B"/>
</NAME.LIST>
<!-- StockGroup Name is to be taken from Column C-->
<PARENT COLUMNREFERENCE="C"/>
<!-- BaseUnits is to be taken from Column D-->
<BASEUNITS COLUMNREFERENCE="D"/>
<!-- Standard Cost details -->
<STANDARDCOSTLIST.LIST SCROLL="Yes">
<DATE COLUMNREFERENCE="E"/>
<RATE FORMULA="=+F# & "/" & +G#"/>
</STANDARDCOSTLIST.LIST>
<!-- Standard Price details -->
<STANDARDPRICELIST.LIST SCROLL="Yes">
<DATE COLUMNREFERENCE="H"/>
<RATE FORMULA="=+I# & "/" & +J#"/>
</STANDARDPRICELIST.LIST>
</MASTER>
Remarks:-
a) The SCROLL attribute is used to specify that the data spans to multiple rows.
b) The SCROLL attribute is UDI Magic specific.
c) As you can see in the Excel sheet, the Standard Cost and Standard Price data for the first Master Record "BunnyBT1" spans to 3 rows. Also note that the Column A (key-field) contains the same Name i.e. "BunnyBT1" as all these 3 rows are part of one MASTER record.
d) Example:-
<STANDARDCOSTLIST.LIST SCROLL="Yes">
<DATE COLUMNREFERENCE="E"/>
<RATE FORMULA="=+F# & "/" & +G#"/>
</STANDARDCOSTLIST.LIST>
The SCROLL attribute used in the above XML tags, instructs UDI Magic that the data spans to multiple rows.
e) Use option "Alter Standard Rates" to specify the Standard Cost and Price details in the Stock Item Master as shown below:-

Here's a snapshot of the Excel sheet that we shall be using in this exercise. You can create a similar sheet or Download it from here.

STEP 1
Write XML tags to create UNIT masters
<MASTER TYPE="UNIT"/>
<NAME COLUMNREFERENCE="D"/>
<ISSIMPLEUNIT>Yes</ISSIMPLEUNIT>
</MASTER>
Remarks:-
a) The above XML tags instruct UDIMagic to create UNIT Masters based on Column D data in the Excel sheet.
STEP 2
Write XML tags to create STOCKGROUP masters
<MASTER TYPE="STOCKGROUP"/>
<NAME.LIST>
<NAME COLUMNREFERENCE="C"/>
<NAME.LIST>
</MASTER>
STEP 3
Write XML tags to create Stock Item Masters
<!-- Create STOCKITEM Masters -->
< MASTER TYPE="STOCKITEM">
<NAME.LIST>
<!-- Fetch the value for NAME tag from Column A of Excel Sheet -->
<NAME COLUMNREFERENCE="A"/>
<!-- ALIAS to be taken from Column B of Excel Sheet -->
<NAME COLUMNREFERENCE="B"/>
</NAME.LIST>
<!-- StockGroup Name is to be taken from Column C-->
<PARENT COLUMNREFERENCE="C"/>
<!-- BaseUnits is to be taken from Column D-->
<BASEUNITS COLUMNREFERENCE="D"/>
<!-- Standard Cost details -->
<STANDARDCOSTLIST.LIST SCROLL="Yes">
<DATE COLUMNREFERENCE="E"/>
<RATE FORMULA="=+F# & "/" & +G#"/>
</STANDARDCOSTLIST.LIST>
<!-- Standard Price details -->
<STANDARDPRICELIST.LIST SCROLL="Yes">
<DATE COLUMNREFERENCE="H"/>
<RATE FORMULA="=+I# & "/" & +J#"/>
</STANDARDPRICELIST.LIST>
</MASTER>
Remarks:-
a) The SCROLL attribute is used to specify that the data spans to multiple rows.
b) The SCROLL attribute is UDI Magic specific.
c) As you can see in the Excel sheet, the Standard Cost and Standard Price data for the first Master Record "BunnyBT1" spans to 3 rows. Also note that the Column A (key-field) contains the same Name i.e. "BunnyBT1" as all these 3 rows are part of one MASTER record.
d) Example:-
<STANDARDCOSTLIST.LIST SCROLL="Yes">
<DATE COLUMNREFERENCE="E"/>
<RATE FORMULA="=+F# & "/" & +G#"/>
</STANDARDCOSTLIST.LIST>
The SCROLL attribute used in the above XML tags, instructs UDI Magic that the data spans to multiple rows.
e) Use option "Alter Standard Rates" to specify the Standard Cost and Price details in the Stock Item Master as shown below:-

Friday, June 13, 2008
Solution to Exercise 11
Alternative 1
Change the Heading in Cell A1 to NAME

Alternative 2
Add the following tags in your XML tags file :-
<COLUMNNAME.LIST>
<COLUMNNAME>NAME</COLUMNNAME>
</COLUMNNAME.LIST>
Remarks:-
1) Tally use the Master's NAME as the key-field to uniquely identify the Master records. Hence, we must have a Column titled as NAME or specify the same using <COLUMNNAME> tag.
Tuesday, June 10, 2008
Exercise 11: Missing Fields - Trace out the error
Here's a sample Excel Sheet that contains Stock Item Masters.
Download the Excel sheet and its XML tags. Try importing the same into the Tally Software using UDIMagic utility. Notice that an Error is generated while importing data. The Error-message is given below for your reference :-
Error Message
"One or more Columns are missing in the Excel Sheet".
Trace out the cause of Error and try fixing it.
Solution to this exercise shall be provided tomorrow.
Solution to Exercise 9
Download the Excel sheet with XML tags for Stock Item Masters with Aliases.
Here's a snapshot of the Excel Sheet used in Exercise 9.

XML tags for Exercise 9
<XMLTAGS CELLREFERENCE="A1" xmlns:UDF="TallyUDF">
<MASTER TYPE="STOCKITEM">
<!-- StockItem Name-->
<NAME.LIST>
<!-- Fetch the value for NAME tag from Column A of Excel Sheet -->
<NAME COLUMNREFERENCE="A"/>
<!-- ALIAS FOR NAME to be taken from Column C of Excel Sheet -->
<NAME COLUMNREFERENCE="C"/>
</NAME.LIST>
<PARENT/>
<BASEUNITS/>
<!-- Partno -->
<ADDITIONALNAME.LIST>
<!-- Part Number to be taken from Column B -->
<ADDITIONALNAME COLUMNREFERENCE="B"/>
<!-- Alias for Part Number to be taken from Column D -->
<ADDITIONALNAME COLUMNREFERENCE="D"/>
</ADDITIONALNAME.LIST>
</MASTER>
</XMLTAGS>
Remarks:-
1) You can specify multiple Aliases for Stock-Item NAME and PART-NUMBER.
2) The <NAME.LIST> tag is used to specify the NAME as well as Alias for Stock-Item NAME.
3) The <ADDITIONALNAME.LIST> tag is used to specify the PART-NUMBER as well as the Alias for Part-Number.
Monday, June 9, 2008
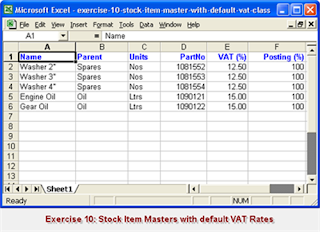
Exercise 10: Stock Item Masters with default VAT Rate
In this exercise, we shall take up how to write XML tags for creating Stock Item Masters with default VAT Rates.
Here's a snapshot of the Excel sheet that we shall be using in this exercise. You can create a similar sheet or Download it from here.
Now, let's begin with writing XML tags.
Tips:-
To get the Tally XML tags, enter few Stock Item records and then Export the same using option "Gateway of Tally >> Display >> List of Accounts >> Alt+E".
Next, select the following:-
Format: XML data
Type of Master: Stock Items Master
For more information on how to get the XML tags from Tally software itself, refer UDIMagic Tutorials
To begin with, we shall write XML tags to create Masters that are required before the Stock Item Masters are created.
STEP 1
Write XML tags to create UNIT masters
<MASTER TYPE="UNIT"/>
<NAME COLUMNREFERENCE="C"/>
<ISSIMPLEUNIT>Yes</ISSIMPLEUNIT>
</MASTER>
Remarks:-
a) The above XML tags instruct UDIMagic to create UNIT Masters based on Column C data in the Excel sheet.
STEP 2
Write XML tags to create STOCKGROUP masters
<MASTER TYPE="STOCKGROUP"/>
<NAME.LIST>
<NAME COLUMNREFERENCE="B"/>
<NAME.LIST>
</MASTER>
STEP 3
Write XML tags to create a single Ledger Master
<MASTER TYPE="LEDGER" SINGLERECORD="YES">
<NAME.LIST>
<NAME>Sale of Spares</NAME>
</NAME.LIST>
<PARENT>Sales Accounts</PARENT>
<ISCOSTCENTREON>No</ISCOSTCENTREON>
<AFFECTSSTOCK>Yes</AFFECTSSTOCK>
<USEFORVAT>Yes</USEFORVAT>
<TAXCLASSIFICATIONNAME>Output VAT @ 12.5%</TAXCLASSIFICATIONNAME>
</MASTER>
Remarks:-
a) The above tags instruct UDIMagic to create a single Ledger Master "Sale of Spares" irrespective of the number of data/rows in the Excel sheet.
b) This is done using the attribute SINGLERECORD="Yes".
c) VAT Rate for "Sale of Spares" has been specified as 12.5%.
STEP 4
Write XML tags to create a single Ledger Master
<MASTER TYPE="LEDGER" SINGLERECORD="YES">
<NAME.LIST>
<NAME>Sale of Oil</NAME>
</NAME.LIST>
<PARENT>Sales Accounts</PARENT>
<ISCOSTCENTREON>No</ISCOSTCENTREON>
<AFFECTSSTOCK>Yes</AFFECTSSTOCK>
<USEFORVAT>Yes</USEFORVAT>
<TAXCLASSIFICATIONNAME>Output VAT @ 15%</TAXCLASSIFICATIONNAME>
</MASTER>
Remarks:-
a) The above tags instruct UDIMagic to create a single Ledger Master "Sale of Oil" irrespective of the number of data/rows in the Excel sheet.
b) This is done using the attribute SINGLERECORD="Yes"
c) VAT Rate for "Sale of Oil" has been specified as 15%.
STEP 5
Write XML tags to create Stock Item Masters
<!-- Create StockItem Masters -->
< MASTER TYPE="STOCKITEM">
<!-- Fetch the value for NAME tag from Column A of Excel Sheet -->
<NAME.LIST>
<NAME COLUMNREFERENCE="A"/>
</NAME.LIST>
<!-- StockGroup Name is to be taken from Column B-->
<PARENT COLUMNREFERENCE="B"/>
<!-- BaseUnits is to be taken from Column C-->
<BASEUNITS COLUMNREFERENCE="C"/>
<!-- Part Number to be taken from Column D -->
<ADDITIONALNAME.LIST>
<ADDITIONALNAME COLUMNREFERENCE="D"/>
</ADDITIONALNAME.LIST>
<!-- VAT Rate to be taken from Column E -->
<RATEOFVAT COLUMNREFERENCE="E"/>
<!-- These tags relate to option SET MODIFY DEFAULT LEDGER FOR INVOICING -->
<SALESLIST.LIST>
<!-- LedgerName -->
<NAME FORMULA="=IF(+E#=12.5,"Sale of Spares","Sale of Oil")"/>
<!-- VAT Class -->
<TAXCLASSIFICATIONNAME FORMULA="=IF(+E#=12.5,"Output VAT @ 12.5%","Output VAT @ 15%")"/>
<!-- Posting Specifies the posting percentage -->
<CLASSRATE FORMULA="=+F# / 100"/>
<REMOVEZEROENTRIES>Yes</REMOVEZEROENTRIES>
</SALESLIST.LIST>
</MASTER>
Remarks:-
a) The <SALESLIST.LIST> tag is used to specify the default Ledger Name and VAT class.
b) The Excel sheet used in this exercise contains two VAT Classes viz "VAT12.5%" and "VAT 15%" which is specified in Column E.
c) The default Ledger for each Stock Item is assigned based upon the VAT rates specified in Column E.
d) We have used the FORMULA attribute to specify conditionally specify which ledger i.e. "Sale of Spares" or "Sale of Oil" is to be assigned to each Stock Item.
e) As mentioned in previous posts, there are 5 special characters which are to be written differently in XML tags. For more information, refer Exercise 8
Understanding the FORMULA attribute
To begin with, we shall first take up "How this formula can be written in MS-Excel?"
Excel Formula
=IF(E2=12.5,"Sale of Spares","Sale of Oil")
Formula used in XML Tags
<NAME FORMULA=IF(E#=12.5,"Sale of Spares","Sale of Oil"/>
Here's a snapshot of the Excel sheet that we shall be using in this exercise. You can create a similar sheet or Download it from here.

Now, let's begin with writing XML tags.
Tips:-
To get the Tally XML tags, enter few Stock Item records and then Export the same using option "Gateway of Tally >> Display >> List of Accounts >> Alt+E".
Next, select the following:-
Format: XML data
Type of Master: Stock Items Master
For more information on how to get the XML tags from Tally software itself, refer UDIMagic Tutorials
To begin with, we shall write XML tags to create Masters that are required before the Stock Item Masters are created.
STEP 1
Write XML tags to create UNIT masters
<MASTER TYPE="UNIT"/>
<NAME COLUMNREFERENCE="C"/>
<ISSIMPLEUNIT>Yes</ISSIMPLEUNIT>
</MASTER>
Remarks:-
a) The above XML tags instruct UDIMagic to create UNIT Masters based on Column C data in the Excel sheet.
STEP 2
Write XML tags to create STOCKGROUP masters
<MASTER TYPE="STOCKGROUP"/>
<NAME.LIST>
<NAME COLUMNREFERENCE="B"/>
<NAME.LIST>
</MASTER>
STEP 3
Write XML tags to create a single Ledger Master
<MASTER TYPE="LEDGER" SINGLERECORD="YES">
<NAME.LIST>
<NAME>Sale of Spares</NAME>
</NAME.LIST>
<PARENT>Sales Accounts</PARENT>
<ISCOSTCENTREON>No</ISCOSTCENTREON>
<AFFECTSSTOCK>Yes</AFFECTSSTOCK>
<USEFORVAT>Yes</USEFORVAT>
<TAXCLASSIFICATIONNAME>Output VAT @ 12.5%</TAXCLASSIFICATIONNAME>
</MASTER>
Remarks:-
a) The above tags instruct UDIMagic to create a single Ledger Master "Sale of Spares" irrespective of the number of data/rows in the Excel sheet.
b) This is done using the attribute SINGLERECORD="Yes".
c) VAT Rate for "Sale of Spares" has been specified as 12.5%.
STEP 4
Write XML tags to create a single Ledger Master
<MASTER TYPE="LEDGER" SINGLERECORD="YES">
<NAME.LIST>
<NAME>Sale of Oil</NAME>
</NAME.LIST>
<PARENT>Sales Accounts</PARENT>
<ISCOSTCENTREON>No</ISCOSTCENTREON>
<AFFECTSSTOCK>Yes</AFFECTSSTOCK>
<USEFORVAT>Yes</USEFORVAT>
<TAXCLASSIFICATIONNAME>Output VAT @ 15%</TAXCLASSIFICATIONNAME>
</MASTER>
Remarks:-
a) The above tags instruct UDIMagic to create a single Ledger Master "Sale of Oil" irrespective of the number of data/rows in the Excel sheet.
b) This is done using the attribute SINGLERECORD="Yes"
c) VAT Rate for "Sale of Oil" has been specified as 15%.
STEP 5
Write XML tags to create Stock Item Masters
<!-- Create StockItem Masters -->
< MASTER TYPE="STOCKITEM">
<!-- Fetch the value for NAME tag from Column A of Excel Sheet -->
<NAME.LIST>
<NAME COLUMNREFERENCE="A"/>
</NAME.LIST>
<!-- StockGroup Name is to be taken from Column B-->
<PARENT COLUMNREFERENCE="B"/>
<!-- BaseUnits is to be taken from Column C-->
<BASEUNITS COLUMNREFERENCE="C"/>
<!-- Part Number to be taken from Column D -->
<ADDITIONALNAME.LIST>
<ADDITIONALNAME COLUMNREFERENCE="D"/>
</ADDITIONALNAME.LIST>
<!-- VAT Rate to be taken from Column E -->
<RATEOFVAT COLUMNREFERENCE="E"/>
<!-- These tags relate to option SET MODIFY DEFAULT LEDGER FOR INVOICING -->
<SALESLIST.LIST>
<!-- LedgerName -->
<NAME FORMULA="=IF(+E#=12.5,"Sale of Spares","Sale of Oil")"/>
<!-- VAT Class -->
<TAXCLASSIFICATIONNAME FORMULA="=IF(+E#=12.5,"Output VAT @ 12.5%","Output VAT @ 15%")"/>
<!-- Posting Specifies the posting percentage -->
<CLASSRATE FORMULA="=+F# / 100"/>
<REMOVEZEROENTRIES>Yes</REMOVEZEROENTRIES>
</SALESLIST.LIST>
</MASTER>
Remarks:-
a) The <SALESLIST.LIST> tag is used to specify the default Ledger Name and VAT class.
b) The Excel sheet used in this exercise contains two VAT Classes viz "VAT12.5%" and "VAT 15%" which is specified in Column E.
c) The default Ledger for each Stock Item is assigned based upon the VAT rates specified in Column E.
d) We have used the FORMULA attribute to specify conditionally specify which ledger i.e. "Sale of Spares" or "Sale of Oil" is to be assigned to each Stock Item.
e) As mentioned in previous posts, there are 5 special characters which are to be written differently in XML tags. For more information, refer Exercise 8
Understanding the FORMULA attribute
To begin with, we shall first take up "How this formula can be written in MS-Excel?"
Excel Formula
=IF(E2=12.5,"Sale of Spares","Sale of Oil")
Formula used in XML Tags
<NAME FORMULA=IF(E#=12.5,"Sale of Spares","Sale of Oil"/>
Exercise 9: Stock Item Master with Aliases
STEPS:-
1) Create an Excel sheet with following Columns :-
a) NAME (Column A)
b) PARTNO (Column B)
c) ALIAS for NAME (Column C)
d) ALIAS for PARTNO (Column D)
2) Enter 5 records in the Excel sheet.
(The 1st row in the Excel sheet must be the HEADER and data must start from the 2nd row onwards).
3) Write XML tags to import data from the Excel sheet into Tally.
(XML tags are to be written in a separate file).
Try importing the data into Tally 9 as well as Tally 7.2. Solution to this exercise shall be made available tomorrow.
Saturday, June 7, 2008
Exercise 8: Concatenate two fields
Here's a sample Excel sheet that contains two Columns of data. viz
a) Stock-Item Name (Column A)
b) PartNo (Column B)
Download the Excel sheet with XML tags for Exercise 8.
Did you notice that this Excel sheet is same as that we provided in Exercise 7. Yes, exactly same. If you had tried importing data into Tally using the Exercise 7 XML tags, only one record would be imported in Tally. The reason begin "Duplicate Stock-Item NAMEs in Column A".
The solution to the said problem is to concatenate (join) the two fields (Name and Part-Number).
CONCATENATING FIELDS
As you can see in the current Excel sheet, the Column A contains "Filter" in all the 5 rows, though the Part-no is different. This is common with the Automobile Industry wherein PART-NUMBERs are always unique, whereas the PART-NAME's are may be repeated. However, Tally Software requires both the Stock-Item Name and Part-Number to be unique. As a result, we need to concatenate (join) these two fields to generate new UNIQUE Stock-Item NAME.
How to concatenate (join) two fields or cells in MS-Excel ?
Example:-
Cell A1 contains "Bush"
Cell B1 contains "S101"
Now, try out writing this formula =+A1 & " " &+B1 in Cell C1. The result you will get in Cell C1 will be "Bush S101".
Well, this is a simple Excel formula. For those are not familiar with Excel formula's will have to spend some-time experimenting the same or Google for "Excel Formula"
Now, let's use this formula in our XML tags. The tags are given below for your reference:-
XML Tags for Exercise 8
<XMLTAGS CELLREFERENCE="A1" xmlns:UDF="TallyUDF">
<MASTER TYPE="STOCKITEM">
<NAME.LIST>
<NAME FORMULA="=+A# & " " & +B#"/>
</NAME.LIST>
<PARENT/>
<BASEUNITS/>
<ADDITIONALNAME COLUMNREFERENCE="B"/>
</MASTER>
</XMLTAGS>
Now, let's try to understand the Formula that is used in the above tags.
XML tag with the FORMULA attribute
<NAME FORMULA="=+A# & " " & +B#"/>
Have you started pulling you hair or feel doing so. Well, please be patient and devote few minutes that may be helpful in building a strong-base.
a) There are some special characters in XML and which are to be written in a different way. These characters are called ESCAPE SEQUENCES and are given below:-
Special Character: & (ampersand sign)
Escape Sequence: &
Special Character: " (quote)
Escape Sequence: "
For a complete list of ESCAPE sequences, please refer FAQ: XML Escape Sequences
b) Simply substitute the special characters with their escape sequences in your Excel Formula.
c) Next, substitute the Row.no in your Excel formula with # (This is UDIMagic specific).
d) The Excel Formula and what we have used in XML tags are given below for reference:-
Excel Formula
=+A2 & " " & +B2
Formula used in XML tags
=+A# & " " & +B#
Exercise 7: Stock Item masters with NAME and PARTNO
Here's a sample Excel sheet that contains Stock-Item masters. Though there are 5 records in the Excel sheet, only one record (i.e. first record) is imported into Tally.
Download the Excel sheet with XML tags and try to find out why only one record is imported into Tally.
Answer to this exercise shall be provided in the next post.
Download the Excel sheet with XML tags and try to find out why only one record is imported into Tally.
Answer to this exercise shall be provided in the next post.
Exercise 6: Stock Item Masters with Opening Stock details
This is an extension to the previous Exercise 5. Herein, we have added three new columns in the Excel sheet which are as follows:-
1) Opening-Qty (Column E in the Excel Sheet)
2) Rate (Column F in the Excel Sheet)
3) Value (Column G in the Excel Sheet)
Download the Excel sheet and XML tags file.
The XML tags for this Exercise will be similar to what we used in Exercise 5, except for the additional tags that are required for OPENING STOCK . The same are given below:-
XML tags for Opening Stock
<OPENINGBALANCE COLUMNREFERENCE="E"/>
<OPENINGRATE COLUMNREFERENCE="F"/>
<OPENINGVALUE FORMULA="=+G# * -1"/>
Remarks:-
1) The first 2 tags are quite simple. We use the COLUMNREFERENCE attribute to specify the Excel-sheet Column from which UDIMagic must read the data.
2) The third tag i.e. OPENINGVALUE uses a new attribute called FORMULA. This is required as the Column G in the Excel sheet contains Stock-Value (positive values) whereas Tally Software requires the Opening Stock Value to be Negative. This may appear to be absurd at first but well Tally uses NEGATIVE values for DEBIT and POSITIVE values for CREDIT effect.
The FORMULA attribute
The FORMULA attribute is a UDIMagic-supported attribute that is used to perform calculations. It allows us to use any valid Excel-formulas. Now, let try to understand the FORMULA that we have used above.
<OPENINGVALUE FORMULA="=+G# * -1"/>
a) As mentioned earlier, Tally requires the Stock-values to be NEGATIVE (Debit-value) and hence we need to multiply the Column G values with -1 (minus 1).
b) In the aforesaid FORMULA, the # (hash symbol) is replaced by the Row numbers by UDIMagic at run-time. For example, when UDIMagic reads the Row no. 2, it interprets the FORMULA as follows:-
=+G2 * -1
c) Formula's in MS-Excel must start with the "=" (equal-to sign). You can manually try out entering this formula "=+G2 * -1" (without the quotes) into Cell H2.
d) It is advised that you first try out writing/testing your Formula in MS-Excel and when found OK, you can modify it as per UDIMagic format, if required. Example =+G2 *-1 becomes =+G# *1
The FORMULA attribute is of wide import as it allows us to use hundreds of Formula's that are supported by MS-Excel. It is adviced that you spend some-time playing with MS-Excel and try out different-different formula's that are commonly used in Excel.
Friday, June 6, 2008
Solution to Exercise 5
Download the Excel sheet and XML tags file for Exercise 5.
Explanation
Before creating STOCKITEM masters, we need to create the other Masters viz. UNIT and STOCKGROUP. The XML tags for same are given herewith for your reference.
XML tags to create UNIT Masters
<MASTER TYPE="UNIT"/>
<NAME COLUMNREFERENCE="C"/>
<ISSIMPLEUNIT>Yes</ISSIMPLEUNIT>
</MASTER>
Remarks:-
1) The UNIT Master does not support Aliases. Hence, we cannot use the <NAME.LIST> tag as used in other Masters.
2) The above tags instruct UDIMagic to create UNIT Masters based upon Column C data in Excel Sheet.
XML tags to create STOCKGROUP Masters
<MASTER TYPE="STOCKGROUP"/>
<NAME.LIST>
<NAME COLUMNREFERENCE="B"/>
<NAME.LIST>
</MASTER>
Remarks:-
1) The above tags instruct UDIMagic to create STOCKGROUP Masters based upon Column B data in Excel Sheet.
XML tags to create STOCKITEM Masters
<MASTER TYPE="STOCKITEM"/>
<NAME.LIST>
<NAME COLUMNREFERENCE="A"/>
<NAME.LIST>
<!-- STOCKGROUP Name to be taken from Column B-->
<PARENT COLUMNREFERENCE="B"/>
<!-- BASEUNITS to be taken from Column C-->
<BASEUNITS COLUMNREFERENCE="C"/>
<!-- PART NUMBER to be taken from Column D-->
<ADDITIONALNAME COLUMNREFERENCE="D"/>
</MASTER>
Remarks:-
1) The <ADDITIONALNAME> tag is used to specify the Part Number.
2) You can also specify Alias for Part-number using the following tags:-
<ADDITIONALNAME.LIST>
<ADDITIONALNAME>....Part No....</ADDITIONALNAME>
<ADDITIONALNAME>....Alias1 for Part No....</ADDITIONALNAME>
<ADDITIONALNAME>....Alias2 for Part No....</ADDITIONALNAME>
</ADDITIONALNAME.LIST>
Tips:-
1) Use Internet Explorer (or Firefox) to view the XML tags file.
2) For editing the XML tags, you can use any XML Editor (like Microsoft Visual Web Developer 2005 Express Edition).
3) You can get the Tally XML tags for any Master from Tally Software itself. All you need to do is to manually enter a dummy record in Tally and then Export it using option "Gateway of Tally >> Display >> List of Accounts >> Alt+E". This generates the XML tags for the Master record in file MASTER.XML
Thursday, June 5, 2008
Exercise 5 - Stock Item Masters with PartNo,BaseUnits
Create an Excel sheet with the following data :-
1) NAME (Stock-Item Name in Column A)
2) PARENT (Stock-Group Name in Column B)
3) PARTNO (Part-Number in Column C)
4) UNIT (i.e.Nos or Ltrs in Column D)
Enter 5 records in the Excel Sheet. Next, write the XML tags in a separate file and try importing the same into Tally using UDIMagic.
Solution to Exercise 5 shall be provided in the next post.
Exercise 4 - Creating Stock-Group Masters before creating Stock-Item Masters
Here's a sample Excel sheet (with Stock-Item Masters) and XML tags file. In this Excel sheet, we have two Columns of data viz.
a) Name (i.e. Stock-Item Name in Column A)
b) Parent (i.e. Stock-Group Name in column B)
Download the Excel sheet and XML tags file.
This exercise illustrates how to create Stock-Group Masters before creating the Stock-Item Masters.
The XML tags for creating Stock-Group Masters are as follows:-
<MASTER TYPE="STOCKGROUP"/>
<NAME.LIST>
<NAME COLUMNREFERENCE="B"/>
<NAME.LIST>
</MASTER>
The XML tags for creating Stock-Item Masters are as follows:-
<MASTER TYPE="STOCKITEM"/>
<NAME.LIST>
<NAME COLUMNREFERENCE="A"/>
<NAME.LIST>
<PARENT COLUMNREFERENCE="B"/>
</MASTER>
And here is the complete XML tags file :-
<XMLTAGS CELLREFERENCE="A1" xmlns:UDF="TallyUDF">
<MASTER TYPE="STOCKGROUP"/>
<NAME.LIST>
<NAME COLUMNREFERENCE="B"/>
<NAME.LIST>
</MASTER>
<MASTER TYPE="STOCKITEM"/>
<NAME.LIST>
<NAME COLUMNREFERENCE="A"/>
<NAME.LIST>
<PARENT COLUMNREFERENCE="B"/>
</MASTER>
</XMLTAGS>
Explanation:-
1) The above tags instruct UDIMagic to first create the Stock-Group Masters based on the Column B data.
2) Next, UDIMagic creates the Stock-Item Masters based on the Column A data.
Tips:-
1) Use Internet Explorer (or Firefox) to view the XML tags file.
2) For editing the XML tags, you can use any XML Editor (like Microsoft Visual Web Developer 2005 Express Edition).
3) You can get the Tally XML tags for any Master. All you need to do is to manually enter a dummy record in Tally and then Export it using option "Gateway of Tally >> Display >> List of Accounts >> Alt+E". This generates the XML tags for the Master record in file MASTER.XML
References
Understanding XML tags
Solution to Exercise 3
Though the Excel sheet (given in Exercise-3) contained 5 records, only 4 records were imported into Tally Sofware. The reason is:-
"The Column A contains duplicate NAME's (i.e. Stock-Item Name BUSH is repeated in Cell A2 and A6). This creates a single Master-record in Tally. In fact, the first Master-record named BUSH gets overwritten with the 2nd record."
Wednesday, June 4, 2008
Exercise 3- Why some records are not imported into Tally ?
Here's a zip file that contains a sample Excel (StockItem masters) and XML-tags file for it.
Try importing the records into Tally using UDIMagic.
Though there are 5 records in the Excel sheet, but only 4 records get imported into Tally. Why ? Download the file and try to find out the reason.
PS: Answer shall be posted in the next post.
Try importing the records into Tally using UDIMagic.
Though there are 5 records in the Excel sheet, but only 4 records get imported into Tally. Why ? Download the file and try to find out the reason.
PS: Answer shall be posted in the next post.
Exercise 2 - Using separate file for XML tags
Herein, we shall take up the same Excel sheet (i.e. StockItem Master) as we did in the Exercise 1. The only difference is that now we shall write XML tags in a separate file rather than the Excel sheet itself.
STEPS:-
1) You may create your own Excel sheet with few Stock-Item sample records or download it from here.
2) Next, create a plain TEXT file using NOTEPAD and write the following XML tags :-
<XMLTAGS CELLREFERENCE="A1" xmlns:UDF="TallyUDF">
<MASTER TYPE="STOCKITEM">
<NAME.LIST>
<!-- Fetch the value for NAME tag from Column A of Excel Sheet -->
<NAME COLUMNREFERENCE="A"/>
</NAME.LIST>
</MASTER>
</XMLTAGS>
3) Save the file as "exercise-2-stock-item-master-xml-tags.xml". Ensure that you select "All Files" in the Save-as Type box, otherwise your file gets saved as "exercise-2-stock-item-master-xml-tags.xml.txt"
4) Once the Excel sheet and the XML tags file is ready, follow these steps:-
a) Start Tally and Create/Open a Dummy Company
b) Minimize Tally
c) Start UDI-Magic and select option "Excel to Tally"
d) Next, select the option "Masters"
e) Next, select the XML tags file and the Excel sheet using the Browse button.
Please note that the XML files is to be selected in the same screen in which you are prompted to select the Excel sheet.
f) Next, Follow instructions to import data into Tally.
Summary
Writing XML tags in a separate file has more advantages as compared to writing XML tags within the Excel sheet. Some of the advantages are :-
a) No need to copy XML tags into each new Excel Sheet that you may create. End-users need to just select the Excel sheet and the XML tags file in UDIMagic to import data into Tally.
b) You can use XML editors that perform Syntax-checking as you type the tags. One of such Editors is "Microsoft Visual Web Developer 2005 Express Edition" which is a FREE software. However, if you write XML tags in the Excel Sheet Comments-section, there will be no Syntax-checking.
c) Editing XML tags is easy as compared to editing tags when written in the Comments section of Excel Sheet
Tuesday, June 3, 2008
Exercise 1: Import Stock-Item Masters into Tally
To begin with, let's take a simple Excel sheet that contains only one Column i.e. the Stock-Item Names.
STEPS:-
1) You may create your own Excel sheet with few sample records or download it from here.
Some important points :-
b) The 1st row must contain Headings
b) The data must start from the 2nd row onwards.
c) UDIMagic stops processing records when it finds a blank or hidden row.
d) There must be a key-field which must be labeled as NAME or ID.
e) The Demo version processes limited records.
2) Next, add XML tags to the comments section of Cell A1. For this right-click on Cell A1 and select option "Insert Comments". The required XML tags are given below for your reference.
<MASTER TYPE="STOCKITEM">
<NAME.LIST>
<NAME COLUMNREFERENCE="A"/>
</NAME.LIST>
</MASTER>
Alternatively, if you have download the sample Excel file, you can view the XML tags by right-clicking on Cell A1 and selecting "Edit Comments".
3) Once the Excel sheet with XML tags is ready, follow these steps:-
a) Start Tally and Create/Open a Dummy Company
b) Minimize Tally
c) Start UDI-Magic and select option "Excel to Tally"
d) Next, select the option "Masters"
e) Next, select the Excel sheet using the Browse button.
f) Next, Follow instructions to import data into Tally.
Summary
If everything goes successful, then 5 records must be imported into Tally. To make the things simple, we had not specified the Stock-Group or Units. Hence, once Stock-Items Names will be imported into Tally
Understanding the XML tags
TAG NAME: MASTER
Example : <MASTER TYPE="STOCKITEM">
Remarks :
This is a UDIMagic-supported XML tag. It instructs UDIMagic that the MASTER type to be created is STOCKITEM.
TAG NAME : NAME.LIST
Example :
<NAME.LIST>
<NAME COLUMNREFERENCE="A"/>
</NAME.LIST>
Remarks :
a) This is a Tally-supported XML tag. You can get Tally XML tags for Masters using option "Gateway of Tally -> Display -> List of Accounts -> Alt+E". This generates tags in Master.xml file.
b) The only new thing here is COLUMNREFERENCE which is UDIMAGIC specific. It tells UDIMagic that the value for NAME tag is to be taken from so and so Column in the Excel Sheet.
c) We have purposefully removed the <LANGUAGENAME.LIST> tag which is Tally 9 specific and is required for multi-lingual support. The pupose of removing this tag was to make our tags compatible with previous versions of Tally Software which do not support the multi-lingual feature.
Additional Resources:-
Getting Start Tutorial
Monday, June 2, 2008
About this Blog
This blog attempts to provide an basic understanding of Tally XML tags which will be useful to Tally users for Importing data into Tally using UDIMagic Software.
Subscribe to:
Posts (Atom)